Kamado grill temperature control is not a gadget problem. It is a vent problem, a fuel problem, and a patience problem, in that order. I have watched people buy a new cooker and a controller in the same month, then lose a ninety dollar brisket because they nudged the bottom vent at the wrong moment and the dome ran away to 375.
A kamado's whole job is holding temperature. Everything else on the box, the shelves, the badges, the phone app, is marketing. If a cooker can sit at 250 for twelve hours through a Savannah thunderstorm and come out the other side still at 250, it is a good cooker. If it cannot, no accessory in the world will fix it.
What follows is the workflow I run on every kamado I touch: the fuel load, the light, catching the rise, the heat soak, the overnight hold, and the shutdown. It works on ceramic and it works on cast aluminum, and it takes one good thermometer and some discipline.
Why you should trust me
I have been cooking competition barbecue for eighteen years, and I have run everything from a rusty offset to a four thousand dollar ceramic egg. I cook two briskets a week, every week, year round, out of a backyard test kitchen in Savannah. Over three years I went through six kamados figuring out which ones hold temperature through a Georgia storm season and which ones turn a ninety dollar packer into charcoal.
I keep temperature logs the way other people keep receipts. I have a drawer of digital thermometers that looks like a bomb squad toolkit, and I have opinions about every one of them. I do not review a kamado without cooking through weather in it, and I do not make set-and-forget claims, because a kamado needs attention. It just needs the right attention.
How I picked what is in this guide
This is a how-to, not a shootout, so the gear list is short on purpose. You need two things to run this workflow: a cooker that actually seals, and one accessory that does real work instead of sitting in a drawer.
The cooker matters more than anything. Ceramic thickness or cast wall thickness is what holds your temperature, and the seal is what lets you control it. A kamado with a perfect body and a failing gasket cooks worse than a cheap one with a good seal. I have watched that happen twice in the same season.
The accessory matters less, but a kamado is a two-zone machine by nature, and the fastest way to add a third zone is to drop a griddle into half the grate. That is the piece I reach for more than any other, and it is the one I would buy first.
The gear this workflow assumes
You can run every step below on any kamado that holds a seal. These two are what I would put in the truck today.
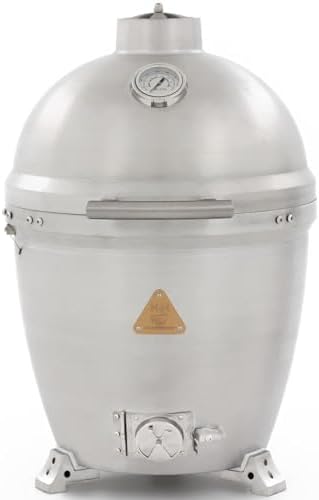
Our pick: Blaze 20‑Inch Cast Aluminum Kamado Grill | Heavy-Duty 1″ Cast Aluminum Body | 20″ Hex Stainless Grates | Tongue‑and‑Groove Seal | BLZ‑20‑KAMADO
 Visit on Amazon →
Check current Amazon price at the link above.
The thing that separates this cooker from the ceramic crowd is exactly what the name says: a heavy cast aluminum body instead of a fired clay one. That matters to me because the number one failure I see on kamados is a cracked firebox or a cracked base, and it almost always happens on the first hard cold snap after a hot summer of cooking. Metal does not crack. It dents, and you have to work at that.
The tongue and groove seal is the other part I care about, because the seal is where cheap cookers lose their temperature control. When the lid does not mate cleanly, air sneaks in around the rim and your vents stop meaning anything. A machined groove that seats into its mate is a much better answer than a foam strip glued to a rim, and it is the reason this cooker will still hold 250 after a few seasons instead of chasing temperature all night.
The 20 inch hex stainless grates give you a real two-zone layout, which is the whole point of the half moon accessory below. A 20 inch class kamado feeds a family, holds a pork butt without crowding, and will take a spatchcocked bird flat. It is not a 24 inch competition rig, so if you are cooking for a team or two full packers at once, size up.
Flaws but not dealbreakers: Cast aluminum does not insulate the way thick ceramic does, so this cooker will need a little more fuel on a long winter cook than a comparable ceramic egg. Plan on one more chimney of lump on a twelve hour brisket in January. The trade is that you will never be filing a warranty claim for a cracked base.
Anyone who cooks year round, in real weather, and wants to stop worrying about ceramic failure will get the most out of this one.
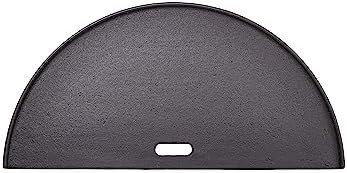
The accessory that earns its drawer space: Kamado Joe Half-Moon Cast Iron Reversible Flat-Top Griddle with Smooth and Ribbed Surface for Classic Joe Charcoal Grill and Smokers in Black, Model KJ-HCIGRIDDLE
 Visit on Amazon →
Check current Amazon price at the link above.
Half moon is the right shape for a kamado and I will argue with anybody about it. A full round griddle turns your cooker into a flat top and nothing else. A half moon covers one side of the grate, which leaves you a live fire on the other side and turns one cooker into three: direct over coals, indirect on the raised side, and a flat top for searing, smash burgers, breakfast, and a griddle full of onions while a butt renders on the far side.
Reversible is the part that makes it worth owning. The smooth face is for anything you want full contact on, burgers, eggs, a seared steak finish, peppers and onions. The ribbed face gives you marks on chicken thighs, sausage, zucchini, and it keeps them out of the grease. Cast iron takes seasoning and it holds heat like a brick, which is exactly what you want when you are dropping cold meat onto a hot surface and do not want the temperature to fall off a cliff.
Flaws but not dealbreakers: It is heavy and it is cast iron, so it needs to be dried and oiled after every cook or it will rust on you, especially in coastal humidity. It is also sized around the half moon grate system on a Classic Joe, so measure your grate layout before you order if you run a different cooker. Set it into the grate with two hands and never drop it onto the firebox.
Anyone who wants to cook a full breakfast on the same grill they did a brisket on the night before should own one of these.
The actual workflow
Now the part you came for. This sequence works on any kamado that holds a seal, and it is the same one I run whether I am cooking chicken thighs on a Tuesday or a packer for a Saturday turn-in.
Step one: Load the fuel properly. Big lump charcoal, not briquettes with binders in them. Fill the firebox to the top of the walls, but do not pack it down and do not mound it over the edge. Leave the ash pan clear underneath. Bigger lumps burn longer and cleaner, and the small crumbs at the bottom of the bag are for the chimney starter, not the firebox.
Step two: Light it in one place, from the top. One fire starter cube buried in the top of the pile, or a chimney of lit coals dumped in the center. One ignition point means the fire spreads slowly and predictably. Four ignition points mean four fires racing each other, and you will spend the next hour fighting a temperature that will not settle.
Step three: Open it up. Bottom vent wide open, top vent off, dome open. Let it run until the smoke goes from thick and white to thin and blue, usually about ten minutes. Thick white smoke on a fresh load is unburned fuel, and if you put meat over it you are painting your brisket with creosote.
Step four: Catch the rise on the way up. Close the dome. Set the bottom vent to about a finger's width and the top vent barely cracked. A kamado is far easier to bring up to temperature than to bring down. You want to meet 250 on the way up, not overshoot to 400 and wait an hour for it to fall back.
Step five: Heat soak for 30 to 45 minutes. This is the step everybody skips and it is the step that decides the cook. The body of the grill has to come up to temperature along with the fire. Skip the soak and your cooker steals heat from the meat for the first hour, which is exactly when you do not want your cook stalling.
Step six: Set the deflector and load the meat. Deflector plate in, grate on, probe at grate level away from the meat, then the meat. Close it and leave it alone. Every time you open the lid you dump heat and let the fire surge.
Step seven: Hold the overnight line. Small adjustments only. If the dome drifts ten degrees, move the top vent a hair and then wait fifteen minutes before you touch anything again. Chasing temperature with big vent moves is how a 250 cook becomes a 325 cook at three in the morning.
Step eight: Cook through the weather. Wind pulls heat off the outside of the cooker faster than cold air does, so a windy night is harder than a rainy one. Rain cools the dome and fakes out your dome thermometer. A cheap windbreak or a spot against the house on the leeward side is worth more than any gadget.
Step nine: Shut it down clean. Both vents closed, lid shut, and walk away. The fire snuffs itself out and the leftover lump is reusable. Never dump hot ash into a trash can, and never spray water into a hot firebox, because thermal shock is how you crack a ceramic one.
Step ten: Use the griddle for the finish. If you want a sear, set the half moon griddle in during the last twenty minutes of the cook so it comes up to temperature with the fire. Smooth side for a hard sear and a smash burger crust, ribbed side when you want marks. You can sear on one half and hold finished meat on the indirect side at the same time.
Where people get this wrong
The gasket is the first suspect when a kamado runs hot with the vents shut. Do the dollar bill test: close the lid on a bill at four points around the rim and pull. If it slides out with no drag, air is getting in and no amount of vent fiddling will fix it. Replace the gasket before you blame your technique.
The dome thermometer is the second suspect. It reads the air at the top of the cooker, not the air at the grate where your meat is sitting, and those two numbers can be thirty or forty degrees apart. Trust a probe at grate level. Use the dome gauge for a quick look, nothing more.
Thin ceramic is the third. If you bought a kamado at a hardware store for a couple hundred dollars, the walls are not thick enough to hold a twelve hour cook through a cold night, the gasket will peel inside a season, and the firebox will crack. That is not a technique problem and it cannot be tuned out.
And the firebox will crack eventually on almost any ceramic cooker. That is not a reason to avoid ceramic, it is a reason to read the warranty before you buy. The question is never whether the firebox cracks. The question is whether the company replaces it without making you feel like you are filing an insurance claim.
What this all costs
A kamado is a lifetime purchase, so the math that matters is cost per cook, not cost per box. Divide what you paid by the number of times you will actually fire it up over ten years. A cooker you use twice a month and keep for a decade beats a cheaper one you use four times and then ignore because it will not hold temperature.
The griddle is a small fraction of the cooker's cost and it is the accessory that changes the most meals, which is the only test an accessory has to pass. Check current Amazon price on both and run the division yourself.
The rest of the budget is charcoal and meat. There is no gadget on the market that will hold your temperature for you, and the people who sell them know it. Learn the vents first. Once you can hold 250 for twelve hours with nothing but a bottom vent and a top vent, you will know exactly what a controller is worth to you, and you will know when you actually need one.
That is the job. A kamado is built to hold temperature. Let it.